SETTING THE BT200 & BT250 TRAPS
Setting your trap correctly is very important to ensure optimal performance and animal welfare. Using a specifically designed tunnel box is required to protect people, pets, native birds and other non-target species.
Affixing the trap to the tunnel
Directions
Fix the trap into the tunnel using rust proof screws, screw the trap to the floor of the tunnel with an equal gap to either side and an approx 5mm gap between the trap and the mesh. It is important the hole in the mesh and the treadle are in line.
Don’t have a tunnel? Choose from the top quality predator trap boxes that we recommend. Or, build your own using our detailed tunnel designs below.
Diagram Key
1. Treadle and hole in baffle must be aligned
2. Setting loop
3. Equal measures
4. 5mm gap
5. Trigger

Setting the trap
Directions
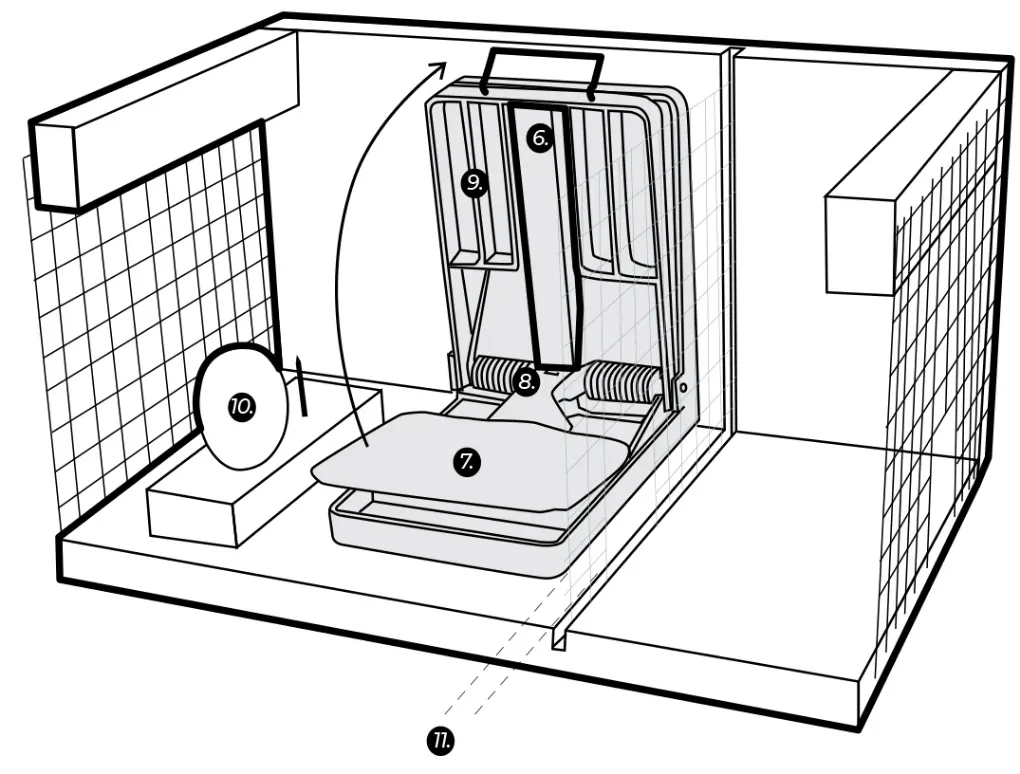
Install bait first before setting trap. Pull upwards on the setting loop bringing the killing bars to vertical, this will swing the trigger up to horizontal and then back to vertical as the killing bars pass over the top of the trigger. The Treadle will rise up and the bottom of the trigger will catch on the killing side of the barb – the trap is now set.
A SET TRAP IS A DANGEROUS PIECE OF EQUIPMENT – HANDLE WITH GREAT CARE.
Screw the lid into place.
Diagram Key
6. Top of trigger arm
7. Treadle
8. Barb (notch under trigger)
9. Killing bars
10. Bait (egg or meat) on wood or nail pedestal
11. 5mm gap
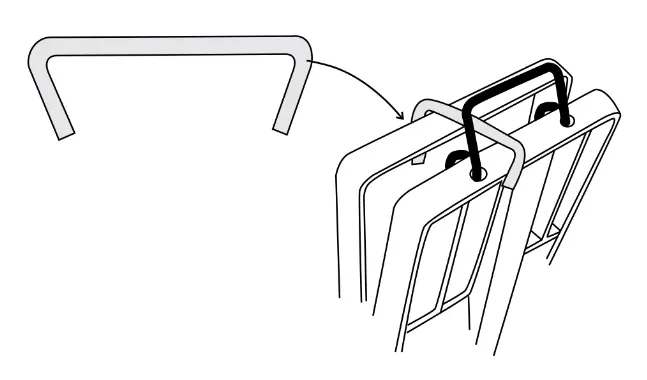
The Safety Clip
Safety clip application
One clip per order, for use when testing and cleaning trap. Available from National Traps.
BT 200 Tunnel Designs
This trap box is designed to work specifically with the BT200 Rat & Stoat Traps.
Traps can be installed one per box or two per box with entry for the predator from either end. Where Weka are present the distance between the outer and inner mesh baffles must be increased.
All dimensions given are internal dimensions so boxes can be made from whatever timber is available, but treated timber is recommended.
BT200 Single set tunnel design
In areas where Weka are present, the tunnel length is 535mm, the distance from the end mesh to the internal mesh increases from 130mm to 265mm.
* Internal width x height measurements:
215mm x 195mm
Materials:
– All timber H4 treated radiata or similar.
– Ends and baffles 19mm galvanised welded mesh.
– 75mm galvanised a/groove decking nails.
* It is recommended that the lid is made from plywood so it doesn’t warp and split in the weather.
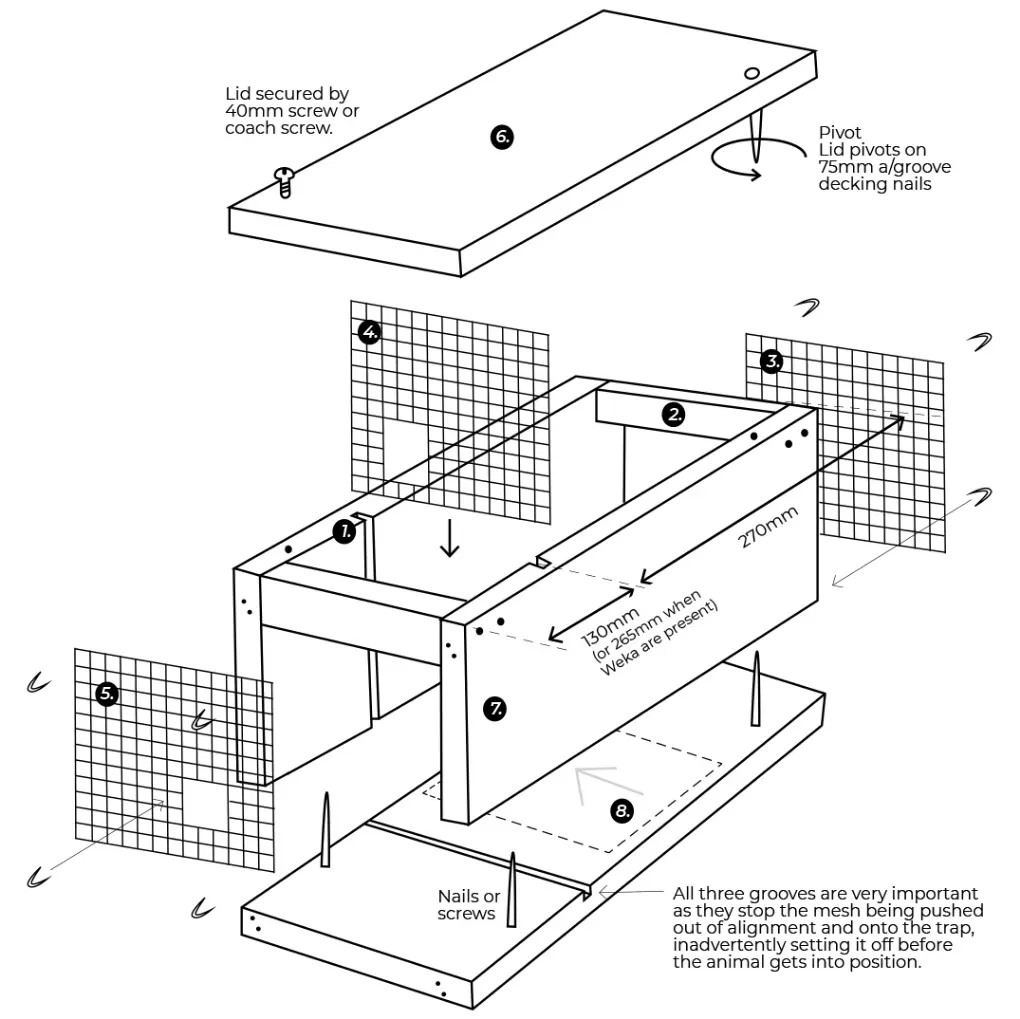
1. Saw grooves
2. Spacer 215 x 40 x 25mm
3. Full mesh. Use 19mm welded mesh for all.
4. Internal Baffle (mesh). Baffle hole 3 (horizontal) x 4 (vertical) meshes, centre to be aligned with centre of treadle on trap and offset to hole in external mesh. Use 19mm welded mesh.
5. External end hole 3×3 meshes
6. Lid and base 400 x 255 x 25mm
7. Sides 400 x 200 x 25mm
8. Trap positional guide
BT 200 Double set tunnel design
In areas without Weka the double set tunnel is 680mm and where Weka are present the length becomes 950mm as the distance from the end mesh to the internal mesh increases from 130mm to 265mm.
* Internal width x height measurements:
215mm x 195mm
Materials:
– All timber H4 treated radiata or similar.
– Ends and baffles 19mm galvanised welded mesh.
– 75mm galvanised a/groove decking nails.
* It is recommended that the lid is made from plywood so it doesn’t warp and split in the weather.
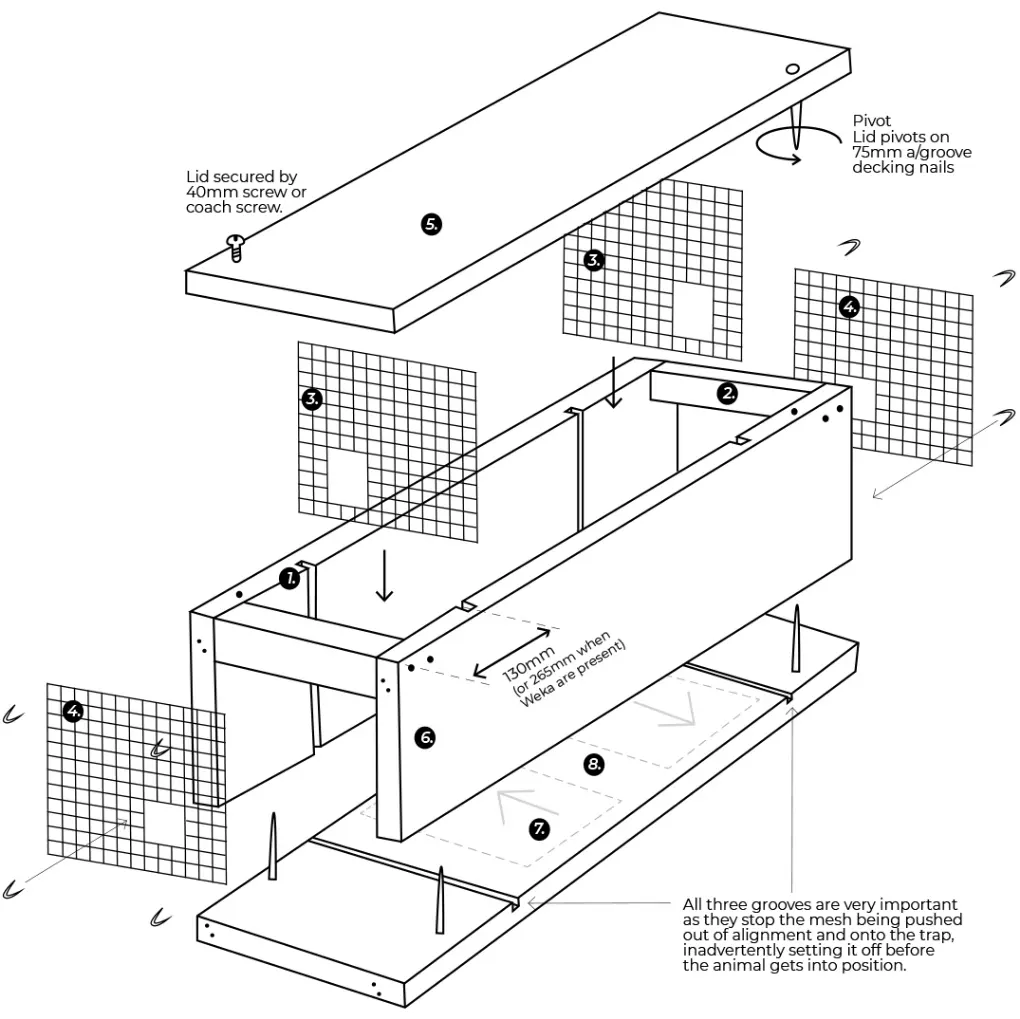
1. Saw grooves
2. Spacer 215 x 40 x 25mm
3. Internal Baffle (mesh). Baffle hole 3 (horizontal) x 4 (vertical) meshes, centre to be aligned with centre of treadle on trap and offset to hole in external mesh. Use 19mm welded mesh.
4. External end holes, 3×3 meshes. Use 19mm welded mesh.
5. Lid and base: 680 x 255 x 25mm (without Weka) 950 x 255 x 25mm (with Weka)
6. Sides: 680 x 200 x 25mm (without Weka) 950 x 200 x 25mm (with Weka)
7. Trap positional guide
8. Common bait area
BT 250 TUNNEL DESIGNS
This trap box is designed to work specifically with the BT250 Stoat & Ferret Trap.
Traps can be installed one per box or two per box with entry for the predator from either end. Where Weka are present the distance between the outer and inner mesh baffles must be increased.
All dimensions given are internal dimensions so boxes can be made from whatever timber is available, but treated timber is recommended.
BT 250 Single set tunnel design
In areas where Weka are present, the tunnel length is 535mm, the distance from the end mesh to the internal mesh increases from 130mm to 265mm.
* Internal width x height measurements:
215mm x 195mm
Materials:
– All timber H4 treated radiata or similar.
– Ends and baffles 19mm galvanised welded mesh.
– 75mm galvanised a/groove decking nails.
* It is recommended that the lid is made from plywood so it doesn’t warp and split in the weather.
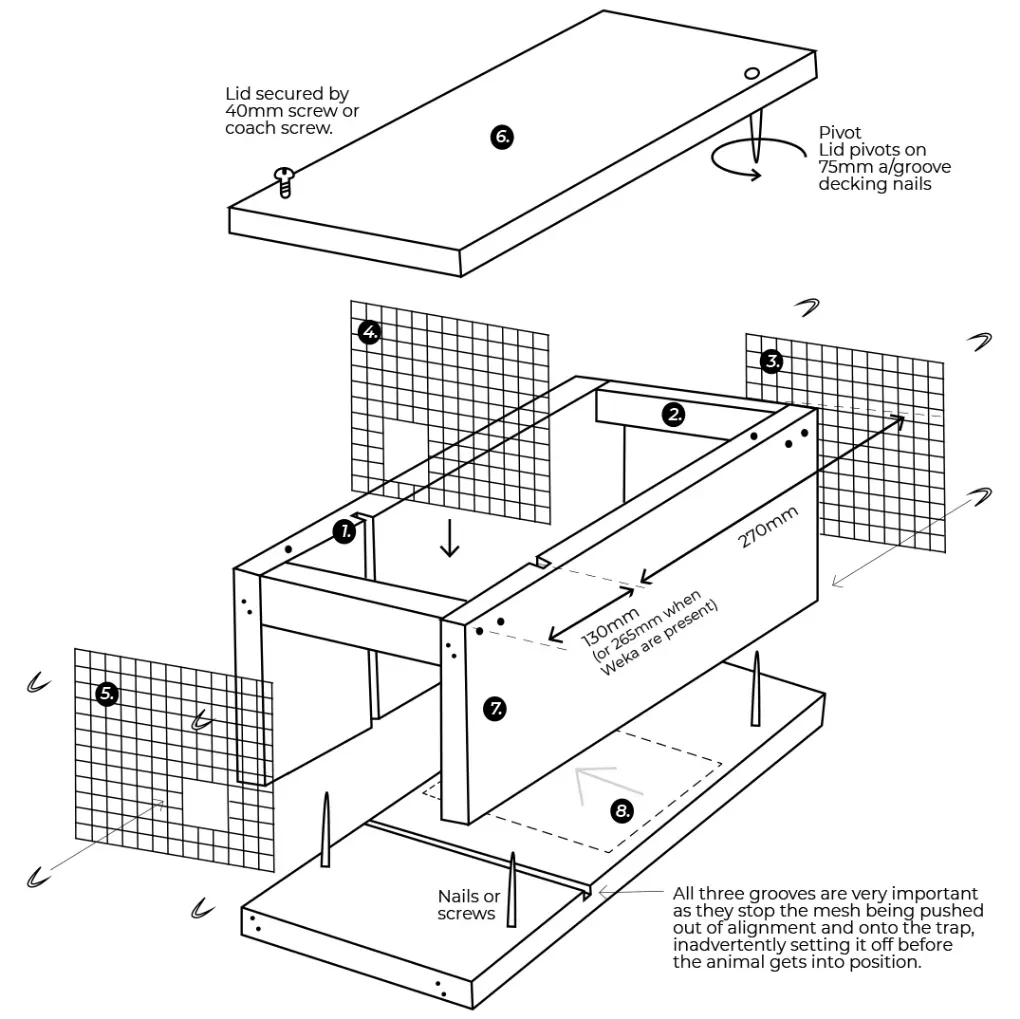
1. Saw grooves
2. Spacer 250 x 40 x 25mm
3. Full mesh. Use 19mm welded mesh for all.
4. Internal Baffle (mesh). Baffle hole 4 (horizontal) x 4 (vertical) meshes, centre to be aligned with centre of treadle on trap and offset to hole in external mesh. Use 19mm welded mesh.
5. External end hole 4×4 meshes
6. Lid and base 400 x 300 x 25mm
7. Sides 400 x 250 x 25mm
8. Trap positional guide
BT 250 Double set tunnel design
In areas without Weka the double set tunnel is 680mm and where Weka are present the length becomes 950mm as the distance from the end mesh to the internal mesh increases from 130mm to 265mm.
* Internal width x height measurements:
215mm x 195mm
Materials:
– All timber H4 treated radiata or similar.
– Ends and baffles 19mm galvanised welded mesh.
– 75mm galvanised a/groove decking nails.
* It is recommended that the lid is made from plywood so it doesn’t warp and split in the weather.
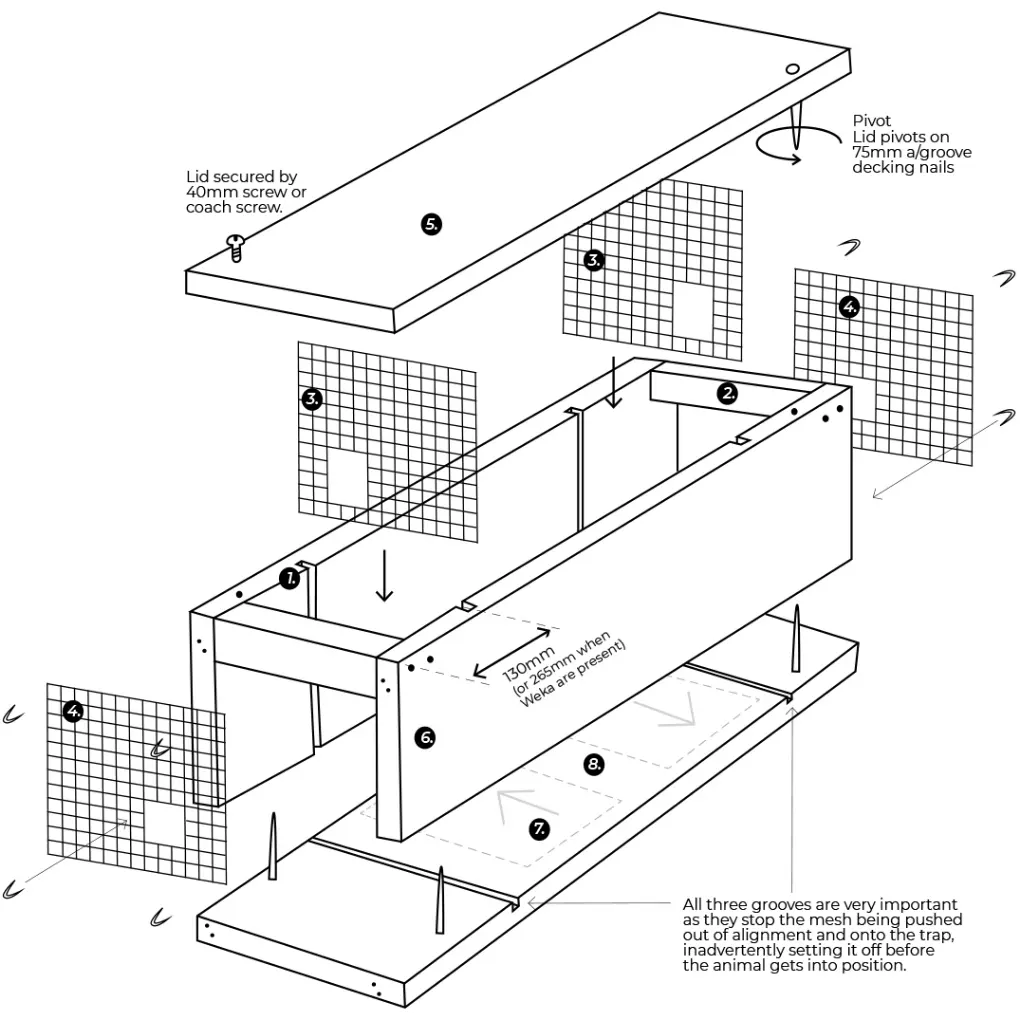
1. Saw grooves
2. Spacer 215 x 40 x 25mm
3. Internal Baffle (mesh). Baffle hole 3 (horizontal) x 4 (vertical) meshes, centre to be aligned with centre of treadle on trap and offset to hole in external mesh. Use 19mm welded mesh.
4. External end holes, 3×3 meshes. Use 19mm welded mesh.
5. Lid and base: 680 x 255 x 25mm (without Weka) 950 x 255 x 25mm (with Weka)
6. Sides: 680 x 200 x 25mm (without Weka) 950 x 200 x 25mm (with Weka)
7. Trap positional guide
8. Common bait area
